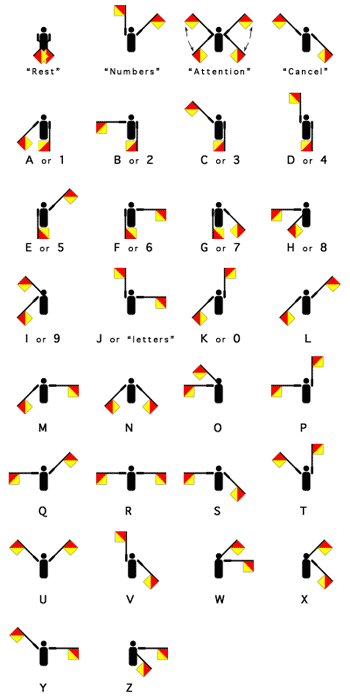
Sempahore is similar to Morse code
in that each letter of a message is translated into another form to
allow it to be more easily communicated. While Morse code is used to
send messages electronically over a telegraph line, semaphore is used to
visually communicate information over long distances.
To use semaphore, an operator holds a flag or lighted wand in each
hand. The operator extends their arms to the correct position and
pauses for each letter of the message. "Attention" is the only signal
that involves movement and the "rest" position is the only time when the
flags should cross.

The Semaphore flag signaling system is an alphabet signalling system based on the waving of a pair of hand-held flags in a particular pattern.
 The flags are usually square, red and yellow, divided
diagonaly with the red portion in the upper hoist.
The flags are held, arms extended, in various positions representing each of the letters of the alphabet. The pattern resembles a clock face divided into eight positions: up, down, out, high, low, for each of the left and right hands (LH and RH) six letters require the hand to be brought across the body so that both flags are on the same side.
 Flag positions in Semaphore
One way to visualize the semaphore alphabet is in terms of circles:
 A and 1 (LH down RH low)
 B and 2 (LH down; RH out)
 C and 3 (LH down; RH high)
 D and 4 (LH down; RH up - or LH up; RH down)
 E and 5 (LH high; RH down)
 F and 6 (LH out; RH down)
 G and 7 (LH low; RH down)
 H and 8 (LH across low; RH out)
 I and 9 (LH across low; RH up)
 J and 'alphabetic' (LH out ; RH up)
 K and 0 zero (LH up; RH low)
 L (LH high; RH low)
 M (LH out; RH low)
 N (LH low; RH low)
 O (LH across high; RH out)
 P (LH up; RH out)
 Q (LH high; RH out)
 R (LH out; RH out)
 S (LH low; RH out)
 T (LH up; RH high)
 U (LH high; RH high)
 V (LH low; RH up)
 W (LH out; RH across high)
 X (LH low; RH across high)
 Y (LH out; RH high)
 Z (LH out; RH across low)
 Numerical sign (LH high; RH up)
 Annul sign (LH low; RH high)
 Error (LH and RH raised and lowered together)

The Semaphore flag signaling system is an alphabet signalling system based on the waving of a pair of hand-held flags in a particular pattern.
The flags are held, arms extended, in various positions representing each of the letters of the alphabet. The pattern resembles a clock face divided into eight positions: up, down, out, high, low, for each of the left and right hands (LH and RH) six letters require the hand to be brought across the body so that both flags are on the same side.
One way to visualize the semaphore alphabet is in terms of circles:
- first circle: A, B, C, D, E, F, G;
- second circle: H, I, K, L, M, N (omitting J);
- third circle: O, P, Q, R, S;
- fourth circle: T, U, Y and 'annul';
- fifth circle: 'numeric', J (or 'alphabetic'), V;
- sixth circle: W, X;
- seventh circle: Z


.jpg)
.jpg)


.jpg)


0 comments:
Post a Comment
Note: Only a member of this blog may post a comment.